We have been rebuilding a website in work, to move from the path-to-deprecation Power Apps Portals to Power Pages with enhanced data model. I may write a post about the benefits of this (there’s lots, do it as soon as you can!), but one thing I struggled to find any useful information on, was how to assign permissions to contacts via a cloud flow.
Why automatic?
You don’t need to. Power Pages includes registration options, where people create accounts via your configured authentication methods. However, our use case is contacts are created for various reasons, by staff, from the people registering, and used in various services.
We have a custom authentication service which allow logging in, but they will see the message of not having permissions to view the pages. This used to be solved via workflows/processes, but as everyone should know – they have been deprecated for years.
How via cloud flows?
Ultimately, there are 4 key columns that need updating on the contact and link to a web role. You should already have web roles setup when you built the website in Power Pages and assigned it to required pages and data.
Setup your flow with a trigger that ensures updates to a contact will not result in an infinite loop – ours are state is active, the columns required are already setup, plus other organisation specific data. The base trigger for us is row updated/added with filters.
Next, get the role from the Site Components table, either via get rows if you know IDs will be retained in each environment, or list rows if getting by name. Either way, you should use an environment variable to define the ID or name in each environment (see my previous articles in releases via Azure Devops).
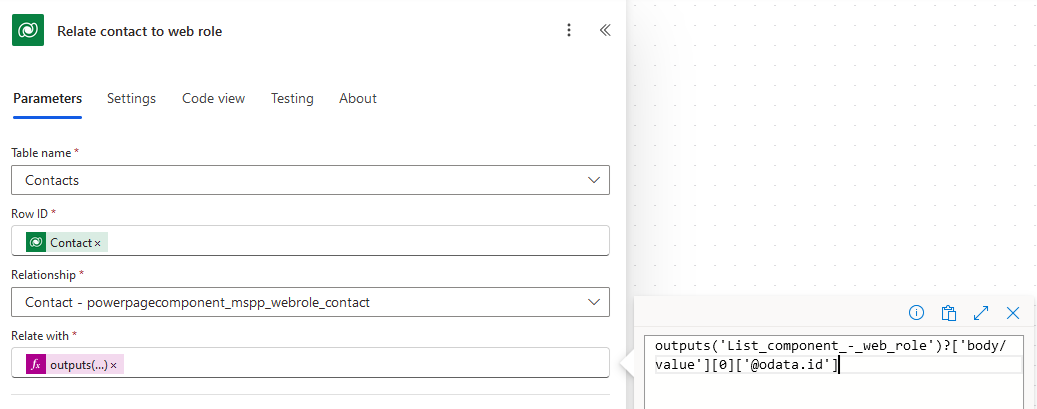
Your 2nd action is where the main problem lies – assignging the web role to the contact.
- The table and ID is obviously contact and the ID of that.
- Relationship is powerpagecomponent_mspp_webrole_contact.
- There’s strange behaviour here, as powerpagecomponent is where most site elements reside (roles, settings, pages, etc) but mspp_webrole is a virtual table over the top of it (which you can’t access via SQL or webapi) and the one above, which is also selectable via SQL like a table.
- Relate with is the @odata.id column of the role.
- This cannot be the id with syntax pluraltablenae(id) due to the nature of how these components work, which has been too convoluted to understand.
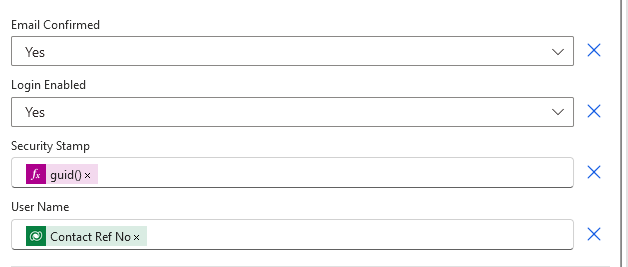
Finally, update the contact with the following columns:
- Email Confirmed = Yes
- Login Enabled = Yes
- Security Stamp = function guid()
- Username = whatever string that matches the login of your authentication service.
Summary/Next…
I hope you found this useful, it was very frustrating to find the answer, which in turn was actually quite simple. Credit goes to this blog https://community.powerplatform.com/forums/thread/details/?threadid=9f300dd1-b679-47a2-ab58-dcfbb501e82f which helped explain the tables well.
Next, I’ll be switching topics to the current trend of AI and Copilot. Until then, have an excellent end of the year break.
0 Comments